Quick Start
What is ESP-AI?
ESP-AI provides a complete AI conversation solution for your development board, including but not limited to the IAT(ASR)+LLM+TTS integration solution for the ESP32 series development boards. It is dependency injected into the project without affecting existing projects.
Why say it includes but is not limited to ESP32 development boards? Because even if your other development board uses a different one, you can still use ESP32 to build an AI service based on this project and use serial communication to send instructions or dialogues to your other development board.
What can ESP-AI do?
Imagine a scenario where you have a robot that can perform some fixed actions, but you want to communicate with it and let it understand some of your commands. If you start implementing this process from scratch, you will start by collecting the audio stream from the microphone and then enter into endless debugging...
Now with ESP-AI, you don't have to do that. You just need to introduce ESP-AI. It has already implemented processes for offline voice wake-up, voice recognition, large language model invocation, text-to-speech, and speaker audio output. Moreover, ESP-AI uses a plug-in design framework, and each of the above steps provides extension methods so you can customize your product at will.
ESP-AI Technology Stack
Software: The server-side code of this project is based on
Nodejs, and the hardware code is based onArduino. Although the server-side is developed based onNodejs, it also provides plugins written in other programming languages. For details, see the plugin development section.Hardware: This project mainly runs on the
ESPseries of development boards.
Features
- ✔️ Customizable offline wake words with multiple built-in wake-up methods (voice, button, serial port, Tianwen ASRPro)
- ✔️ Complete conversation chain: IAT (ASR) ➡️ LLM/RAG ➡️ TTS
- ✔️ Fast response algorithms for TTS/LLM, designed to balance service cost while providing the quickest response time
- ✔️ Supports conversation interruption
- ✔️ Recognizes user commands (appliance control, singing, etc.) and can dynamically respond based on context
- ✔️ Configurable
- ✔️ Plugin-based, allowing integration with any LLM/TTS/IAT using plugins
- ✔️ One-to-many relationship between service and clients, with independent configuration for each client (hardware)
- ✔️ Connection supports authentication
- ✔️ Full-chain streaming data interaction
- ✔️ Developer platform offers: free services, visual configuration, etc.
- ✔️ Client configuration webpage provided
- ✔️ Easily handles high concurrency scenarios (requires Nginx for load balancing)
- ✔️ Ready to use out of the box
🧐 Next Steps
- [ ] 🤔 Improve accuracy of built-in offline wake-up (currently recommended to use Tianwen ASRPro)
- [ ] 🤔 Incorporate AI into user intent inference (e.g., "Turn off the light quickly" and "Turn on the light quickly" will both be recognized as "Turn on the light" command)
- [ ] 🤔 Online wake word generation
- [ ] 🤔 Client OTA support
- [ ] 🤔 Develop plugins in other languages (to avoid relying solely on Node.js for plugin development)
- [ ] 🤔 Provide a dedicated development board (to avoid current complex wiring)
Development Environment Setup
Local Development Environment Setup
For future upgrades, simply download the relevant files from the release page. The dependencies below only need to be installed once.
No Nodejs environment is required when installing the server using a Docker image or a Windows lazy package.
| Environment | Version | Note |
|---|---|---|
Nodejs | >= v18.x | npm version needs to be below 10.x; 6.x to 9.x are fine |
VsCode IDE | Latest | |
Arduino IDE | >= v2.x | |
ESP Board | v2.x | Search and install the ESP board in Arduino IDE |
| Hardware Code Libraries | Latest | Import plugins from /client/libraries in the GitHub repository into the IDE's plugins. Default location is C:\Users\Username\Documents\Arduino\libraries |
Hardware Code Library Explanation
| Filename | Note | Version |
|---|---|---|
| arduino-audio-tool | https://github.com/pschatzmann/arduino-audio-tools | |
| WebSockets | New version IDE can search and install directly | v2.4.0 |
| Arduino_JSON | New version IDE can search and install directly | v0.2.0 |
| esp-ai | ESP-AI temporarily unavailable for search and installation | |
| xiao_ming_tong_xue_inferencing | Offline voice recognition model temporarily unavailable for search and installation |
Applying for an iFLYTEK Key
Registration URL: https://console.xfyun.cn/services/iat
ESP-AI fully integrates with iFLYTEK's IAT, LLM, and TTS services, so you can test using iFLYTEK's services before using your own.
Client
The hardware side is called the client. The documentation uses' Ardunio IDE 'to program, but you can also use' PlatformIO '.
Flash with Official Firmware (Zero Code, No Environment Setup)
Using this method to upload the firmware means you don't need to download client dependencies or anything else; you just need to upload the firmware to the board and then connect the pins.
Tutorial Video: 【ESP-AI 官方固件烧录(零代码/不搞环境配置/不下载包)】 https://www.bilibili.com/video/BV1dyHhefE9M/?share_source=copy_web&vd_source=041c9610a29750f498de1bafe953086b
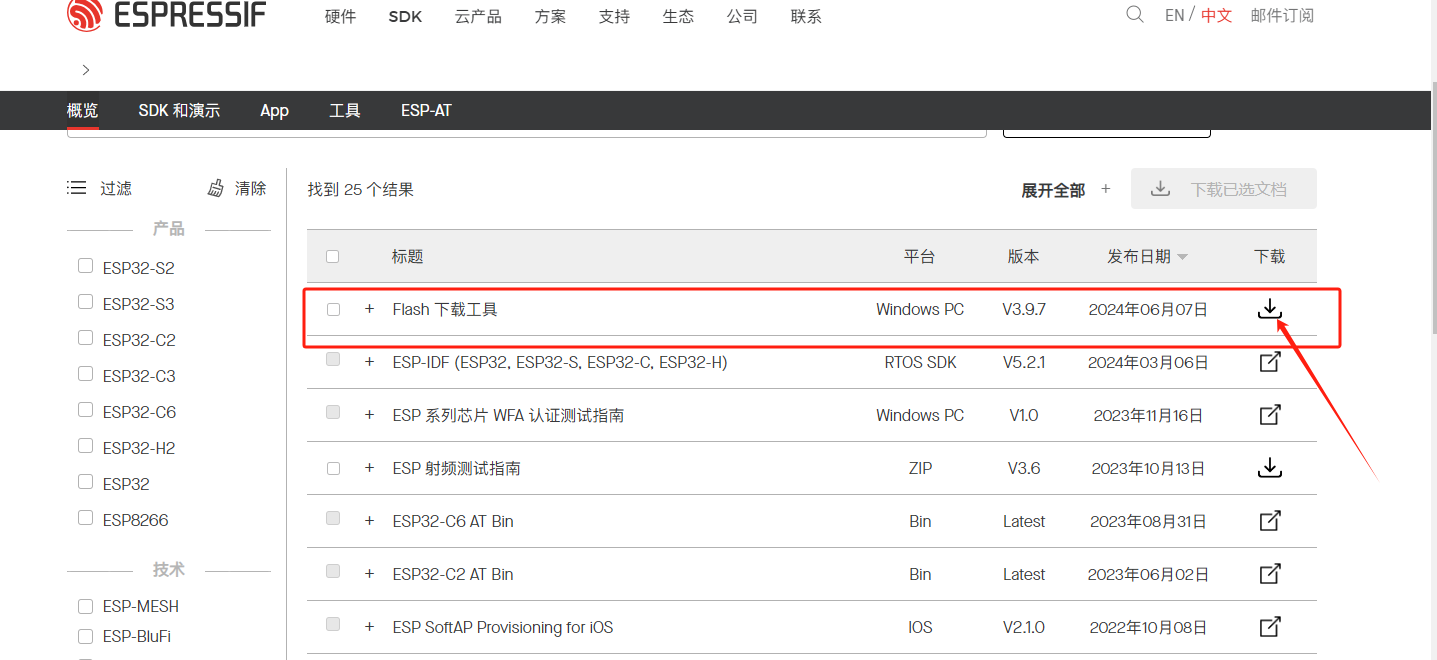
Download the Flashing Tool
Download the Flash Download Tool from the Espressif official website: https://www.espressif.com.cn/zh-hans/support/download/all.
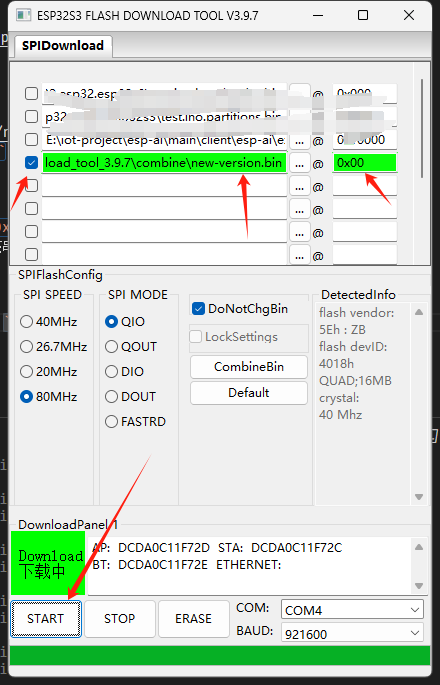
Download the ESP-AI Firmware
Firmware download link: http://101.34.59.36:7002/public/ota/new-version.bin This firmware includes OTA upgrade functionality, which will be detailed in the following sections.
Upload Firmware to the Development Board
- Configure the information as shown in the image below. Select the downloaded
.binfile, and enter the address as0x00. - Click the START button to upload (Note: Before clicking, make sure to close any monitoring of the serial port from other applications, such as Arduino monitoring the serial port, otherwise, it will fail.) alt text
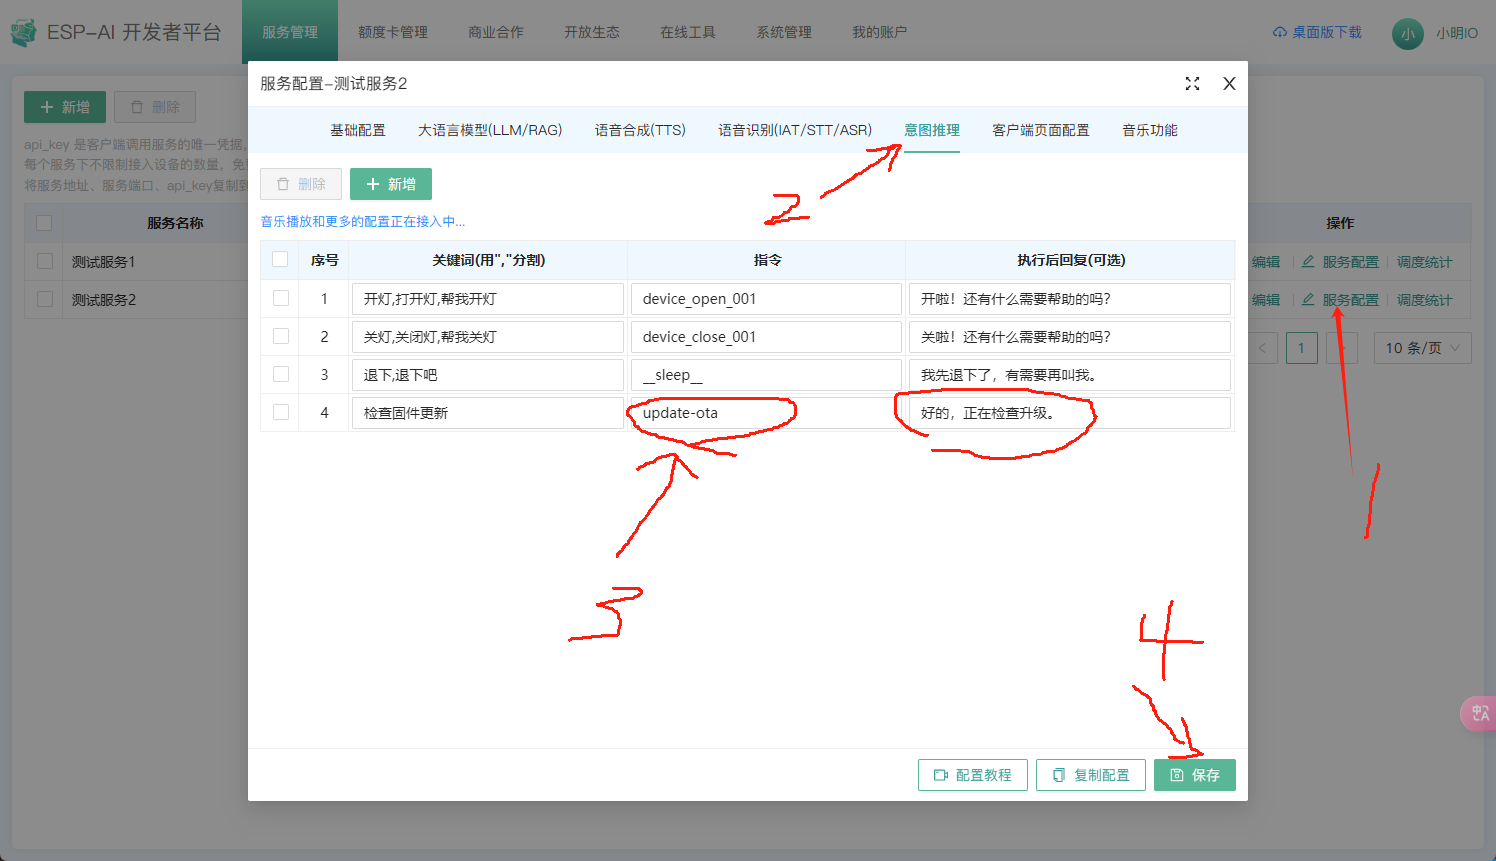
OTA Upgrade
When a new version of ESP-AI is released, you don't need to flash it again; simply say "Check for firmware updates," and the detailed effect can be seen in the video. The configuration steps are as follows:
- Set up the intent command on the developer platform. alt text
- Restart the development board (press the RST button once).
- After waking up the device, call out "Check for firmware updates."
Hardware Code - Arduino
- Create a file
example/example.ino. Note: The file must be placed in a folder, and the folder name must be the same as the file name. - Open the
example.inofile withArduino IDE. - Write the following code and upload it to the development board.
#include <esp-ai.h>

ESP_AI esp_ai;

void setup() {
  Serial.begin(115200);
  // [Required] Debug mode, will output more information
  bool debug = true;
  // [Required] WiFi configuration: { wifi SSID, wifi password } Note: Use double quotes!
  ESP_AI_wifi_config wifi_config = { "oldwang", "oldwang520" };
  // [Required] Service configuration: { service IP, service port, params max 256 byts }
  ESP_AI_server_config server_config = { "192.168.1.5", 8088, "api-key=your_api_key&p2=test" };
  // [Required] Offline wake-up solution: { solution, recognition threshold }, "edge_impulse" | "diy", for "diy" you can call the esp_ai.wakeUp() method to wake up

  ESP_AI_wake_up_config wake_up_config = {};
  strcpy(wake_up_config.wake_up_scheme, "asrpro");  // 唤醒方案
  strcpy(wake_up_config.str, "start");              // 串口和天问asrpro 唤醒时需要配置的字符串,也就是从另一个开发版发送来的字符串
  // strcpy(wake_up_config.threshold,  0.95);  //  内置语音唤醒时需要配置 唤醒阈值 0-1
  // strcpy(wake_up_config.str, 10);  // 引脚高低电平唤醒时需要的引脚IO

  // [Optional] Microphone pin configuration: { bck_io_num, ws_io_num, data_in_num }
  ESP_AI_i2s_config_mic i2s_config_mic = { 4, 5, 6 };
  // [Optional] Speaker pin configuration: { bck_io_num, ws_io_num, data_in_num, sample rate }
  ESP_AI_i2s_config_speaker i2s_config_speaker = { 16, 17, 15, 16000 };
  // [Optional] Volume control configuration: { input pin, input max value (1024|4096), default volume (0-1) }
  ESP_AI_volume_config volume_config = { 34, 4096, 0.4 };

  // Start running ESP-AI
  esp_ai.begin({debug, wifi_config, server_config, wake_up_config, volume_config, i2s_config_mic, i2s_config_speaker});
}

void loop() {
  esp_ai.loop();
}
Hardware Code - IDF
// Under development...
Hardware Materials
| Hardware | Quantity | Price |
|---|---|---|
| esp32s3(N16R8) | 1 | 25 |
| INMP441 | 1 | 8 |
| Max98357A | 1 | 5 |
| LED | 1 | 0.5 |
| Small speaker | 1 | 6 |
| Breadboard | 1 | 5 |
| Dupont wires | Some | 1 |
Hardware Wiring - ESP32-S3
| ESP32-s3 | INMP441 | Max98357A | Potentiometer (optional) | LED (optional) |
|---|---|---|---|---|
| 3v3 | VDD | VDD | VDD | |
| GND | GND | GND | GND | GND |
| GND | L/R | |||
| 4 | SCK | |||
| 5 | WS | |||
| 6 | SD | |||
| 15 | DIN | |||
| 16 | BCLK | |||
| 17 | LRC | |||
| 34/35 | OUT | |||
| 18 | Positive |
Wiring diagram to be added...
Hardware Wiring - XIAOESP32S3
Under development...
Hardware Wiring - nodemcu32s
Under development...
Server
The server provides services to the hardware (client), used to call LLM, IAT, TTS, etc., and can conveniently provide extensions. The server and client have a one-to-many relationship, meaning one server can serve multiple clients.
Server Code - Node.js
- In the previously created
exampledirectory, create a fileindex.js. - Add the following code to
index.js:
const espAi = require("esp-ai");
const config = {
     gen_client_config: ()=>({
        // For details, see the server...
    })
};
espAi(config);
- Install server dependencies
bash:no-line-numbers
yarn add esp-ai
npm install esp-ai
pnpm install esp-ai
- Run the server
# For production environments, use pm2 to run the service to ensure reliability and performance: pm2 start ./index.js -i max
node ./index.js
Docker Installation
- We will name the container:
esp-ai-server - Place the configuration file at:
/esp-ai-server/index.js - The host machine port is:
8088
Note: These three configurations can only modify those on the host machine; the image settings must be hard-coded as follows.
Running the Container
docker run -itd -p 8088:8088 -v /esp-ai-server/index.js:/server/index.js --name esp-ai-server registry.cn-shanghai.aliyuncs.com/xiaomingio/esp-ai:1.0.0
The configuration file is mapped to /esp-ai-server/index.js. You need to modify this configuration file yourself. After making changes, you can restart the service:
docker exec -it esp-ai-server pm2 restart all
Installing Plugins Inside the Container
Execute the plugin installation command directly inside the container:
docker exec -it esp-ai-server yarn add [plugin-name]
After modifying the configuration file, you still need to restart the container:
docker exec -it esp-ai-server pm2 restart all
Viewing Runtime Logs
docker exec -it esp-ai-server pm2 logs
Update Dependency
Replace the version number in the code below with the latest version number.
docker exec -it esp-ai-server yarn add esp-ai@1.15.6
After the update, you need to check whether the version number in package.json is correct. If it is correct, restart the container.
docker exec -it esp-ai-server cat ./package.json
Lazy Package
Under implementation...
Detailed Documentation
Finally
Shout "Xiao Ming classmate" and you can chat with it happily! 🎉